Go Serverless with Python and AWS Chalice


Chalice includes an API for integrating your lambda with Amazon API Gateway, Amazon S3, Amazon SNS, DynamoDB, etc.
Let's go directly to our example.
You will need:
- PyCharm as the IDE (or any other IDE you feel comfortable with)
- Python 3.8 (you can also use 3.9, according to this lambda runtimes page)
- An AWS account.
Credentials
Once you have your account this is what you need to do to use your credentials (I'm using MacOS):
$ mkdir ~/.aws
$ cat >> ~/.aws/config
[default]
aws_access_key_id=YOUR_ACCESS_KEY_HERE
aws_secret_access_key=YOUR_SECRET_ACCESS_KEY
region=YOUR_REGION (such as us-east-1, ca-central-1, etc)
Here's a link if you need further information on different configurations for credentials.
Once you have your AWS account, you need to get your credentials (your
aws_access_key_id and aws_secret_access_key); take a look at this page to know how to do it.Now, let's create a virtual environment with our Python installation
$ python3 -m venv venv38
then we activate our environment
$ . venv38/bin/activate
You should then see your virtual environment activated at the left on your command line
$ (venv38) Creating your Project
Next, let's install Chalice on your newly created virtual environment, using pip
(venv38) $ python3 -m pip install chalice
Using chalice we create a new project:
$ chalice new-project genesis
This will create a 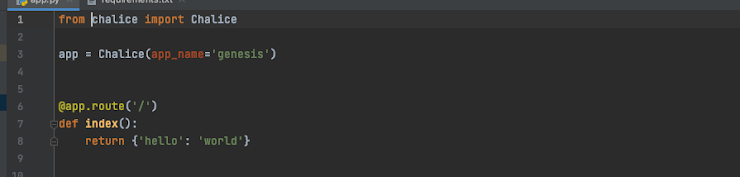
genesis directory, if you take a look inside you'll see the files that have been created for you
(venv38) $ ls -lt genesis
total 8
-rw-r--r--  1 claudio  staff  732 26 Feb 12:50 app.py
-rw-r--r--  1 claudio  staff    0 26 Feb 12:50 requirements.txt
Let's open the
app.py file using PyCharmThe
new-project command created a sample app that defines a single view, /, that when called will return the JSON body{"hello": "world"}Deploying your project
Let's deploy this app. You need to be in the
genesis directory and run chalice deploy
  $ chalice deploy
  Creating deployment package.
  Creating IAM role: genesis-dev
  Creating lambda function: genesis-dev
  Creating Rest API
  Resources deployed:
  	- Lambda ARN: arn:aws:lambda:ca-central-1:1111111111:function:genesis-dev
  	- Rest API URL: https://4vqkca5y5f.execute-api.ca-central-1.amazonaws.com/api/
This powerful command did many things. You have now an API up and running using API Gateway and a Lambda:
$ curl https://4vqkca5y5f.execute-api.ca-central-1.amazonaws.com/api/
{"hello":"world"}
Sign in to your AWS account, you will see the
genesis-dev Lambda created In the "search" box, look for the Lambda service


Also, check the API Gateway entry that Chalice created


If you click inside the API Gateway you will see only a GET response created.

You've now created your first app using
chalice.How long did it take to create it ? You can play around with your app changing the response and re-deploying it.
URL Parameters
Let's make some changes to our
app.py file. Our application so far has a single view that allows you to make an HTTP GET request to / . from chalice import Chalice
app = Chalice(app_name='genesis')
SONGS_TO_ALBUM = {
'misunderstanding': 'Duke',
'abacab': 'Abacab',
'ripples': 'A Trick of the Tail'
}
@app.route('/')
def index():
return {'hello': 'world'}
@app.route('/songs/{song}')
def songs_to_album(song):
return {'album': SONGS_TO_ALBUM[song]}
songs_to_album that allows a user to specify a song (from Genesis, who else?). The view function takes the song name and returns the album to which this song belongs. Notice the
@app.route decorator has a URL pattern of /songs/{song}.This means that the value of {song} is captured and passed to the view function. You can also see that songs_to_album takes a single argument.Now we've changed
app.py let's redeploy our application. $ chalice deploy
curl https://4vqkca5y5f.execute-api.ca-central-1.amazonaws.com/api/songs/misunderstanding
{"album":"Duke"}
Using DynamoDB
Let's go deeper and use another AWS service: DynamoDB. First we need to import the
boto3 library $ python3 -m pip install boto3
You also have to add the
boto3 to your requirements.txt file as a dependency. Now go to your AWS dashboard, look for the DynamoDB service and create a new genesis_albums table, like this one:
They key of the table is
song_name .Because we're managing two different AWS resources (AWS Lambda and AWS DynamoDB) that need to communicate between them, the AWS Identity and Access Management needs to be modified, to give access to the Lambda, so it can read on the table.
Since we're not using yet Terraform (an open-source infrastructure as code software tool that give us the possibility to manage resources in AWS using code), we will be doing a "dirty" change on the AWS dashboard.
First you need to grab the IAM permissions to access the table. In your newly created table, go to Actions, then to "Create access control policy"
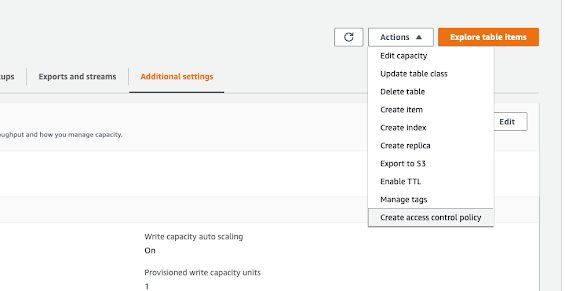
Choose the identity provider then generate policy


Go to IAM services


Your Lambda is now ready to read from the table. In your
app.py the new code will look like this:import boto3 as boto3
from chalice import Chalice
app = Chalice(app_name='genesis')
@app.route('/')
def index():
return {'hello': 'world'}
@app.route('/songs/{song}')
def songs_to_album(song):
table_instance = boto3.resource('dynamodb').Table('genesis_albums')
return table_instance.get_item(Key={'song_name': song}).get('Item')
We're using boto3 to get the DynamoDB resource. Look at this beauty: just 2 lines of code inside the lambda itself.
Redeploy your application
$ chalice deploy
curl https://4vqkca5y5f.execute-api.ca-central-1.amazonaws.com/api/songs/Duchess
{"song_name":"Duchess", "album":"Duke"}
Listening to an SQS queue
With minimal change, Chalice lets you listens to an SQS queue, first create your queue:

The Visibility timeout should be at least 60 seconds.

Then add just 3 (three!! ) lines of code on app.py to listen to your SQS event
@app.on_sqs_message(queue='the-genesis-queue')
def handler(event):
    for record in event:
        print(f'Message Body: {record.body}')
Redeploy your app. Chalice will take care of the subscription to the queue.
$ chalice deploy
Creating deployment package.
Reusing existing deployment package.
Updating policy for IAM role: genesis-dev
Updating lambda function: genesis-dev-handler
Subscribing genesis-dev-handler to SQS queue the-genesis-queue
Updating lambda function: genesis-dev
Updating rest API
Resources deployed:
  - Lambda ARN: arn:aws:lambda:ca-central-1:111123445323:function:genesis-dev-handler
  - Lambda ARN: arn:aws:lambda:ca-central-1:111123445323:function:genesis-dev
  - Rest API URL: https://4vqkca5y5f.execute-api.ca-central-1.amazonaws.com/api/
Go to our SQS queue and send a message, your lambda handler should receive the message


Now let's go to CloudWatch to check our logs


In our next post I will talk about security for the API endpoints, Terraform and maybe serverless framework .
Stay tuned!!
You will find all the examples in my Github .
Sources: Python , boto3 Docs , Chalice Github repo , Chalice docs , Terraform , PEP 8, AWS Chalice article


Comments
Post a Comment